Saturday, 13 December 2008


One of my cute friends from high school has a bow blog. They recently moved to London & she says that they don't love bows like we do over here. So she's up & doing her blog again. Check her blog out. It's http://kylaskreations.blogspot.com/ She sent me this today:


"I wanted to let you know that I will offer 50% off any (one-time) order that tells me they found my website through your blog."


So check it out if your looking for some darling bows & want a killer deal - especially since Christmas is so close! & don't forget to tell her you found her site through my blog to get your 50% off!

down & curly

These pictures just don't do it justice how cute this really is. My husband loves when I keep her hair down & he just kept saying how cute it was today. It's the curls - they're too cute not to try. It makes her looks so grown up:( But it also makes her hair look thicker than what it really is.

I let her hair air dry today. Then I put some curling gel from Garnier Fructis all over. I pinned the bangs back before I started to curl away.
I'm going to have to demonstrate these curls - it's the same way I curl mine & I've been doing them more often on her lately & they seem to hold a lot better than wringlet curls. I start by curling just the top layer. Then go fill in spots (i ended up curling all of her hair but on myself, I don't curl all of the underneath - it gets too thick). You hold the curling iron closer to the base of the head & wrap the hair around the curling iron & hold for 20-25 seconds. After I've gone all the way around - I brush my fingers through to make it not look "just off the curling iron look". Then I spray pretty good with hair spray to hold it. That's it. This would work on any length of hair. Try it out & let me know how it worked on your girlie.

Wednesday, 10 December 2008

fAncY hAIr

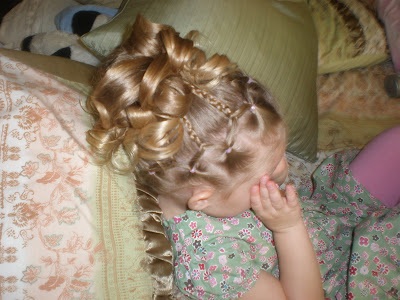
A little fancy today - but that's okay. Here it is:
Do sections all around the head - like a headband & add the elastics.
Grab 2 of the sections & split them in half. Braid these 2 together. To make it even, I split each one less than half apart so there were four sections. I brought the 2 middle pieces together so I had the 3 strands to braid.
Braid all around the head doing the same thing.
Pull it all up into a pony.
I did wringlet curls in the pony.
Then start pinning the curls up with bobby pins
Spray to hold. & that's it!!

Monday, 8 December 2008

3 messy piggies

Wow!! I think that's the longest I haven't posted something new. I'm so sorry to those who are waiting for a new idea. I was gone for 2 weeks & I'm finally getting back to the routine of things. But it's not slowing down with Christmas right around the corner. It gets so hectic!! We have to get a babysitter 4 different times this week!! & I'm sure life is in the fast lane for everyone right now. I'm pretty proud I squeezed in time to post this. I've been thinking of some new things - if I can just get some more time added to life:)

Here it is:

Start by doing the tuck under knot
I hope you can see from this picture, but I sliced the hair down from the tuck under not down to her ear. This is what started my inside out french braid.
As part of the 3 sections to start the braid, I used the half of the tuck under knot for one section & divided the other part in half to give me 3 sections.
Do the braid on each side, just braiding down a few strands.
Divide the rest of the hair into 3 sections. Put into messy piggies. As I was pulling the hair up, I split each end of braids in half so that one half went into side pony & the other half of it went into the middle. Do it with both sides - so the sides don't have more hair than the middle. It makes it more even. Spray to hold. If she would have let me - I would have added 3 cute bows, but she's kind of getting to that stage where she doesn't want her bows in anymore. So bummed out!

Saturday, 22 November 2008

Saturday, 15 November 2008

I haven't been able to blog as much as I normally like to. It's been a couple crazy months & it's just going to get more hectic with the holidays. Plus Thanksgiving with my fam & a trip to Disneyland pretty much makes it a very crazy next month. So I'm planning on posting some new stuff - just not as often throughout the holidays. Life just gets too hectic & stressful. But once January comes around I'll get around to posting more often. But don't you just love this time of year?? & a random thought - who's counting down for the Twilight movie to come out?? Can't wait - yep planning on going to the midnight movie with my team Edward shirt!!

I've been wanting to post these for awhile now and I thought this would be a good time to post these darling pictures that moms have sent me. I am so impressed...most of these are pictures are from stuff moms saw on here & took it to the next level & totally made it their own. Enjoy!! *sorry most are small - I wish they were bigger so you can see how cute they all are

is this not the cutest face? with her 3 little piggies on top? i really like how she added the 2 piggies underneath too.


her fourth birthday...so cute

these are out of order - they go with the bigger pics below.


okay - this little girl melts my heart. her mom sent me a lot of fun photos of her. i hope she doesn't mind me mentioning this but this cute girlie has autism & she has to do something to get her hair out of her face or she'll chew on it. I think she's become quite the creative mom with lots of patience. I admire her lots...thanks for the email.


this is macie - her mom got this idea from the worm twists i did a few weeks ago. this is one i see & think why didn't i think of that - it looks darling. (somewhere i had another pic but it didn't upload i see - sorry - hope you can see it well enough)

These got out of order some how - they go along with the bigger pictures up top. This is actually a girl who nannies these 2 girls. So she gets to do 2 little girlies hair!! & i think she does an awesome job!!

Thanks to all of you for sending photos. If you have something you want to share - send them to me. Or if you have step by step instructions you want to share also - send them my way. We all love new ideas.

Tuesday, 11 November 2008

corkscrew twist tutorial

I really do hate hearing myself on camera but I'm doing this for the good of my blog followers - so you have to suffer with me...sorry!!

I hope these tutorial are helpful to you who are trying to learn. The key to doing it though is PRACTICE. I've had lots of practice to perfect it & so it's fast & easy for me. You'll just get better & better each time you do it and you learn your own mistakes along the way so don't feel discouraged!!